
At Ravelston we are proud of our facilities and recognise that a players golfing experience is enhanced when the course is in tip-top condition. Whilst the weather often plays a major part in influencing the course, we can all help by abiding by some simple rules such as repairing pitch marks on the green. We should all repair our own pitch mark and at least one other where possible. If you don’t make a mark we would hope that you still repair another. Always have your pitch mark repairer to hand.

If you repair a pitch mark badly it can actually do a lot more harm than if you had left it alone, so it’s essential you know how to do it correctly.
It’s not just for the sake of the greens either, there is nothing more infuriating for a golfer than to see a perfect putt knocked off line, especially through no fault of their own.
But it is alarming how many golfers seemingly neglect to repair a pitch mark, don’t know how to repair a pitch mark in the correct way, or perhaps think they are not allowed to because of the Rules of Golf.
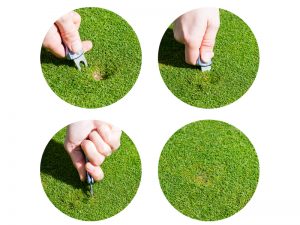
As you can see below, the end product of a badly repaired pitch mark is an ugly brown scar left on the green that not only looks awful, but that also affects the roll of yours and other peoples’ putts.
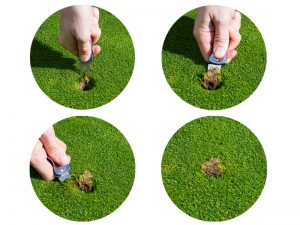
How do I repair a pitch mark correctly?
To achieve the ideal look, you need to push the earth inwards as demonstrated above, rather lifting it upwards, which is what causes the unsightly scarring. Once you have circled your pitch mark gently pushing the earth inwards towards the centre of the crater, you can then tap down any excess material to leave the smoothest possible surface.